Tackling a dripping faucet seems like a simple fix, but many DIY enthusiasts make common mistakes that can lead to bigger issues. From mismatched parts to improper installation, these errors can turn a minor annoyance into a major headache. In this post, we’ll explore the most frequent blunders people make when attempting to repair dripping faucets and provide practical tips on how to avoid them.
Whether it’s using the wrong tools or underestimating the complexity of the task, there are plenty of pitfalls. By understanding these missteps and learning how to sidestep them, you can save yourself time, money, and frustration in the long run. Let’s dive into the dos and don’ts of DIY faucet repair.
Table of Contents
ToggleUnderstanding Faucet Types and Drip Causes
Differentiating Faucet Types
Faucets come in many types, including cartridge, compression, ball, and ceramic disc faucets. Each type has unique internal mechanisms that can lead to different causes of leaks. For example, a cartridge faucet may leak due to worn-out O-rings or a damaged cartridge itself. On the other hand, a compression faucet may drip because of a faulty valve seat or worn-out washers.
Understanding these distinctions is crucial when attempting DIY repairs on dripping faucets. If you misidentify the faucet type or its specific issues, you might end up replacing the wrong parts or worsening the problem.
Identifying Common Drip Causes
Understanding the common causes of leaks is essential for effective repairs. Worn-out washers are often culprits in compression faucets while damaged cartridges can cause drips in cartridge faucets. O-rings and valve seats play significant roles in preventing leaks in various faucet types.
For instance, if your ball-type faucet is leaking from the handle area when turned on, it’s likely due to worn-out inlet seals or springs within the mechanism.
Importance of Choosing Right Replacement Parts
Choosing suitable replacement parts for your specific faucet type is vital for successful DIY repairs. Using incorrect components can exacerbate existing problems or create new ones altogether. For example:
- If you have a ceramic disc faucet and mistakenly install parts designed for a compression faucet during repair work, it could lead to persistent leakage.
- Similarly,
- using generic O-rings instead of those specifically made for your cartridge-type fixture might result in ongoing drips despite attempted fixes.
It’s important to consult manufacturer guidelines or seek professional advice when unsure about which replacement parts are compatible with your particular dripping faucet.
Importance of Shutting Off Water Supply
Preventing Potential Damage
Before starting any DIY repairs on dripping faucets, it’s crucial to shut off the water supply. Failing to do so can lead to significant water damage in your home. Imagine water gushing out at full force while you’re trying to fix a leaky faucet – that’s a recipe for disaster! The last thing you want is water seeping into your walls and floors, causing costly structural damage.
It’s not just about protecting your property; it’s also about ensuring safety. High water pressure from an open tap can create hazardous situations, especially if someone accidentally turns on the faucet while you’re working on it. By turning off the water supply, you eliminate these risks and provide a safer environment for yourself and others in the household.
Locating and Turning Off the Main Water Supply
So, how do you go about shutting off the main water supply? In case of an emergency or when doing routine maintenance, knowing how to locate and turn off this valve is essential. Typically, the main shutoff valve is located near your water meter or where the main line enters your home. It could be in a basement, crawl space, utility room, or outside close to where the pipe enters your house.
Once you’ve found it, turning off the main shutoff valve is usually as simple as giving it a quarter-turn clockwise. This action cuts off all water flow into your home effectively. If there are individual shutoff valves for different areas of your house (e.g., kitchen sink), make sure to turn those off too before beginning any repair work.
Remember that taking care of these steps beforehand will save you from potential disasters later on!
Proper Steps for Faucet Removal
Step-by-Step Process
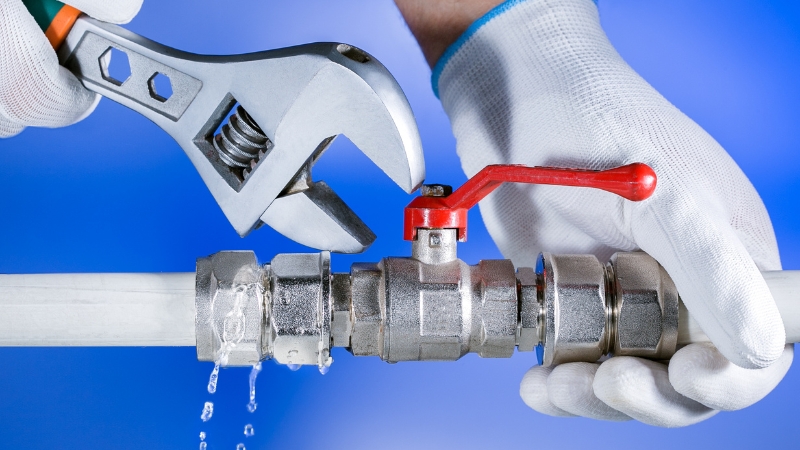
Removing a bathroom faucet requires following a specific set of steps to ensure it is done safely and effectively. First, start by turning off the water supply using the shut-off valve discussed in the previous section. Then, use an adjustable wrench to disconnect the water supply lines from the faucet. Next, unscrew and remove any remaining mounting hardware that secures the faucet to the sink or countertop.
Once all connections are detached, carefully lift and remove the old faucet from its position. It’s important to be gentle during this process to avoid damaging surrounding plumbing or fixtures. Finally, thoroughly clean the area where the old faucet was installed before proceeding with installing a new one.
It’s crucial not to rush through these steps as haste can lead to mistakes that may cause damage or make reinstallation more challenging.
Essential Tools and Their Proper Usage
The right tools are vital for successfully removing a bathroom faucet without causing unnecessary damage. An adjustable wrench is essential for loosening nuts and bolts holding various components together. Having a basin wrench can greatly simplify reaching tight spaces under sinks when removing mounting nuts.
When using these tools, ensure they fit snugly onto their respective fasteners before applying force. This prevents slipping which could result in rounded edges on nuts or bolts making them difficult to remove.
Dealing with Stubborn Components
During removal, it’s common to encounter stubborn or corroded components such as nuts and bolts that refuse to budge easily due to mineral deposits or age-related deterioration. In such cases, applying penetrating oil like WD-40 can help loosen stuck parts over time.
If dealing with severely corroded components that won’t yield even after applying penetrating oil, consider seeking professional assistance instead of risking further damage attempting DIY solutions beyond your expertise level.
Troubleshooting Leaky Bathroom Faucets
Identifying the Leak
When dealing with dripping faucets, it’s crucial to correctly identify the source of the leak. Start by conducting a visual inspection of the entire faucet. Look for any visible signs of leaks, such as water pooling around the base or dripping from the spout. Listen for any hissing or dripping sounds that could indicate an internal leak.
To pinpoint the exact location of the leak, perform simple tests such as turning on each handle individually and checking for drips. This can help determine if one specific handle is causing the issue or if both are contributing to the problem.
Potential Underlying Issues
Persistent faucet leaks can often be attributed to underlying plumbing issues within the fixture. Overtightening connections during installation or repair can lead to damaged seals and gaskets, resulting in leaks over time. Another common culprit is worn-out components like O-rings and washers, which may need replacement to resolve leaks effectively.
Moreover, using improper tools or techniques when working on faucets can exacerbate existing issues rather than fixing them. For instance, using an adjustable wrench incorrectly might cause damage to delicate parts inside the faucet assembly.
In some cases, problems with water pressure and temperature regulation within a home’s plumbing system can also contribute to persistent faucet leaks. It’s essential to consider these potential underlying causes when troubleshooting a dripping faucet.
Repairing Washer and O-Ring Issues
Replacing Worn-out Washers and O-Rings
Worn-out washers and O-rings are often the culprits. To replace these components, start by turning off the water supply to the faucet. Use a wrench to carefully disassemble the faucet, exposing the internal components. Locate the worn-out washer at the base of the stem assembly or cartridge and remove it using your fingers or pliers.
Next, identify the type and size of washer needed for replacement. Take the old washer to a hardware store to ensure you get an exact match. Once you have a new washer, insert it into place on top of its seat in the faucet body before reassembling all parts in reverse order.
To address worn-out O-rings, disassemble your faucet further until you can access them near where your spout joins with other parts of your fixture. Remove any remaining pieces of old rings from their grooves using a small screwdriver or utility knife before installing new ones that fit snugly without stretching too much.
Addressing a Corroded Valve Seat
Impact of Corroded Valve Seat
A corroded valve seat can significantly affect the performance of a faucet and lead to potential leaks. When the valve seat corrodes, it prevents the rubber washers or O-rings from forming a proper seal, causing water to drip even when the faucet is turned off. This dripping not only wastes water but also contributes to an increase in water bills.
The corrosion can also result in irregular water flow and cause annoying sounds such as rattling or squeaking when using the faucet. If left unaddressed, it may lead to more severe damage requiring costly repairs or even complete replacement of the faucet.
To avoid these issues, it’s crucial to understand how to effectively address a corroded valve seat.
Cleaning or Replacing Corroded Valve Seat
When encountering a corroded valve seat, DIY enthusiasts have two options: cleaning or replacing it. If the corrosion is minimal and hasn’t deeply affected the surface, cleaning might be sufficient. Using fine sandpaper wrapped around a flat-head screwdriver, gently remove any debris and corrosion from the valve seat’s surface. Ensure that no rough spots are left behind that could further damage new washers.
However, if the corrosion is extensive and has caused pitting on the valve seat’s surface, replacement becomes necessary for restoring proper functionality. To do this:
- Turn off your home’s main water supply.
- Disassemble your faucet by following similar steps as outlined in repairing washer issues.
- Once you reach the valve seat, use pliers or an adjustable wrench to carefully unscrew and remove it.
- Take note of its exact measurements before purchasing a new one at your local hardware store.
- Install the new valve by applying plumber’s grease on its threads before securing it back into place with gentle yet firm turns using your tools.
By taking these steps for either cleaning or replacing a corroded valve seat, you can ensure optimal performance without any leaks from your faucets.
Preventive Measures
To prolong the lifespan of valve seats and prevent future corrosion issues:
- Regularly clean out sediment buildup by removing aerators and soaking them in vinegar overnight.
- Invest in high-quality washers made from durable materials like ceramic discs rather than traditional rubber ones which tend to degrade faster.
Handling Aerator and Spray Hose Repairs
Common Issues
A common issue with aerators in bathroom faucets is a decrease in water flow due to mineral deposits clogging the small openings. This can result in uneven or weak water streams. On the other hand, spray hoses may face problems such as blockages or malfunctions that affect their ability to function properly.
It’s essential to address any reduction in water flow promptly. Neglecting this issue can lead to further buildup of mineral deposits, making it harder to clean and restore proper functionality. Similarly, issues with spray hoses should be addressed early on to prevent them from escalating into more severe problems.
Disassembly and Troubleshooting
To improve water flow through the faucet’s spout, you can disassemble the aerator and clean out any debris or mineral buildup using a brush or vinegar solution. Carefully reassemble the aerator after cleaning it thoroughly for optimal results.
When encountering issues with spray hoses, start by checking for any kinks or blockages along its length. If there are no visible obstructions, detach the hose from both ends and inspect for internal clogs or damages that may require repair or replacement.
Another troubleshooting tip involves examining the spray head for potential issues such as worn-out components that could be affecting its performance. By identifying these problems early on, you can prevent them from causing further damage to your faucet system.
Knowing When to Call a Professional Plumber
Signs of Insufficient DIY Repairs
DIY repairs can be tempting, but there are signs when they may not be enough for dripping faucets. If you find yourself constantly fixing the same issue or if the problem seems to worsen after your attempted repair, it might be time to consider professional help. If you notice water damage or mold around the faucet area, this could indicate a more serious underlying problem that requires expert attention.
It’s important to recognize that some plumbing system issues go beyond the scope of simple DIY fixes. For instance, if your faucet problem involves complex internal mechanisms or intricate parts that require specialized tools and knowledge, attempting to fix it without these resources may only lead to further complications. Rooter Works Plumbing experts emphasize that certain faucet problems demand a level of expertise and equipment that surpasses what an average homeowner possesses.
Benefits of Seeking Professional Assistance
One key benefit of seeking professional plumbing assistance for dripping faucets is the assurance of quality work. A skilled plumber has both the experience and access to a wide range of tools necessary for effective repairs. They also possess in-depth understanding about various types of faucets and their respective repair requirements.
Moreover, calling in a professional saves time and hassle by avoiding potential mistakes caused by lack of skill or familiarity with specific plumbing system components. By entrusting the job to experts from reputable companies like Rooter Works Plumbing, homeowners can rest assured knowing that their faucet issues will be resolved efficiently and effectively.
Safety Tips for DIY Plumbing Projects
Importance of Protective Gear
When tackling diy plumbing tasks, it’s crucial to prioritize safety. This includes wearing protective gear like gloves and safety goggles. These items shield you from potential harm, such as cuts from sharp tools or splashes of hot water or chemicals. For instance, when dealing with a leaking faucet, the use of gloves can protect your hands from coming into contact with harmful substances that may be present in the water.
Always remember that even seemingly simple tasks like fixing a dripping faucet can pose risks if proper precautions aren’t taken. Therefore, investing in protective gear is an essential step in ensuring your safety during any plumbing project.
Handling Sharp Tools and Hazardous Materials
Another key aspect of diy plumbing safety involves handling sharp tools and potentially hazardous chemicals properly. When attempting to repair a dripping faucet, ensure that all cutting tools are used cautiously to avoid accidental injuries. Be mindful when working with chemical cleaners or solvents by following the manufacturer’s instructions carefully.
For example, when using a wrench to tighten loose fittings on a leaky faucet, always maintain control over the tool to prevent it from slipping and causing injury. Similarly, when applying chemical solutions to remove mineral deposits causing the drip, take care not to spill them on yourself or surrounding surfaces.
Turning Off Electricity in Wet Areas
Before embarking on any plumbing work in wet areas such as bathrooms or kitchens where faucets are typically located, it’s vital to turn off electricity sources nearby for added safety measures. Water conducts electricity which poses serious risks if electrical outlets or appliances come into contact with moisture during repairs.
Therefore, before attempting any diy plumbing task involving faucets or pipes near electrical fixtures (such as light switches), switch off power at the breaker box first. This precaution significantly reduces the risk of electric shock accidents while you’re working on resolving issues like dripping faucets.
Conclusion
You’ve now gained a solid understanding of common faucet issues and how to tackle them like a pro. Remember, shutting off the water supply is crucial before diving into any DIY faucet repair. Whether it’s a leaky bathroom faucet or a corroded valve seat, following the proper steps for removal and repair is key. Knowing when to call in a professional plumber is just as important as mastering the art of DIY fixes. Safety should always be your top priority, so keep those tips in mind for your next plumbing project. Now, armed with this knowledge, go forth and conquer those dripping faucets with confidence!
Experience the Ultimate Solution for Dripping Faucets with Garcia Plumbing and Home Restoration!
At Garcia Plumbing and Home Restoration, we recognize the annoyance and potential water waste caused by dripping faucets in your home. Our team, known for their proficiency in faucet repair, is committed to fixing those pesky leaks and restoring efficiency to your plumbing.
Our mission at Garcia Plumbing and Home Restoration goes beyond mere fixes; we strive to enhance the overall functionality and conservation in your home. We’ve built a remarkable reputation in Contra Costa County for our dedication to quality, our extensive plumbing knowledge, and the trust we’ve established with numerous happy clients. Don’t let a dripping faucet disrupt your daily routine or inflate your water bills. Contact us today for top-tier faucet repair services and enjoy the satisfaction of a flawlessly functioning plumbing system!